Project 2021
CRM Onboarding

Feature Summary
In this feature, the first-time mobile signup user is guided through setting up their organisation by fetching their basic user data, calendar information, contact information, or other information, which allows
them to personalize their experience. Users have the flexibility to choose not to share such sensitive information and explore the application with just sample data that we offer.
My Role
Responsible for redesign, discovery and ideation, interaction design, wireframes and prototype.
Tools
Figma, Principle, Protopie
Problem Statement
To give users a quick and smooth onboarding by collecting the most important data in order to personalise their application and assure users about their data safety.
Concerns of the Customer
-
In a Pew Research study, 60% of the people said that they refused to install an app once they found out about all the personal information it requires beforehand. That’s why it is very important to ask only for the most essential information and to ask for permission before collecting any of the user’s data too.
-
While studies point to the fact that consumers are willing to exchange more of their personal information for greater personalized recommendations and offers, concerns regarding the security of their information remain. A KPMG survey highlighted that 55% of online consumers have declined to make a purchase online due to concerns over data privacy.
-
Poor onboarding is the third most important reason for customers to churn, right after wrong product fit and lack of engagement.
Sign Up


Signup through web
1. If the user is new they can Signup on the web.
2. Once the account details are provided an account will be created.
3. After a few seconds of startup screen it will take you to the Welcome page.
Welcome Page


Getting the Company info
1. User will be asked to enter a mandatory company name.
2. Other details such as Phone number, Time zones, Location, and Language will be prefilled.
3. This will reduce the time taken by the user and do a quick login.
4. Switching on sample data will help new users to experience the app with some sample data.
5. By default sample data toggle will be on.


Edit Information
1. Users are given the flexibility to edit the information like Time zone, Currency locale and language.
Setup your Organisation

Lead Import Flow
1. First the users are given the flexibility to either fill the data to thier application or to launch directly with the sample data.
2. User can import leads from their address book or from file such as CSV file.
3. Once the leads are imported there will be an visual indication on the left with a Green tick and also information on how many leads have benn imported.
4. At the bottom users are given an info message about their data safety and why they needed this data.
5. This data we fetch is to give a personalised experience to the user.

Calendar Sync Flow
1. Once lead import is done user do contact import or even skip to Calendar sync. Since none of it is mandatory to launch the application.
2. When users click Calendar Sync they are given 4 option like google calendar, Apple calendar, Outlook calendar and Calendly.
3. User can login and import data and also set the sync types.
4. Deactivation of any calendar can also be done here.
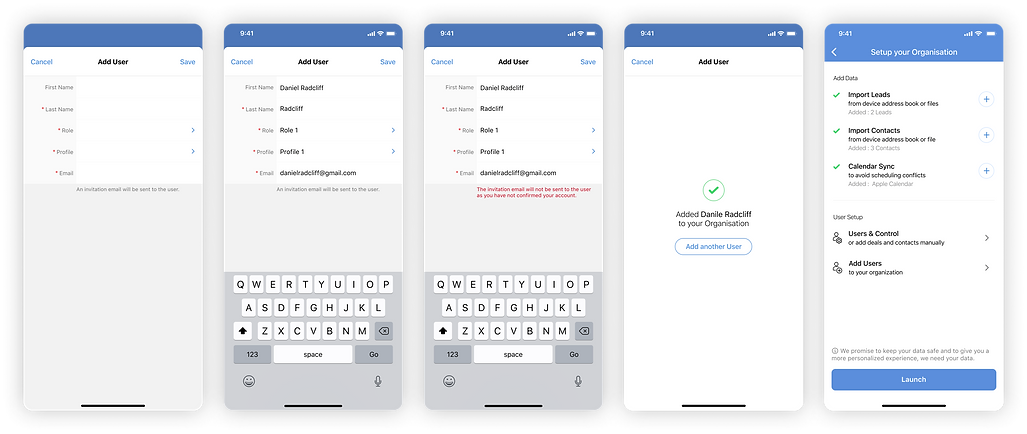
Add User Flow
1. User can be added to your organisation.
2. Once an user is added you can choose to continue adding another user or cancel.
3. Once all user datas are added you can launch the application.

User & Control
1. User are categorised into Active / Inactive / Unconfirmed / Deleted / Developer users.
2. New user can be added using the add button.
3. Multi-select to deactivate users.
4. User status is available near the user's profile.
5. Easily search the user.
6. Super Admin is indicated with a purple tag.
User / Admin Details
1. On tapping user it will take you to the user detail page.
2. Basic user information such as Role, mail id, phone number and profile picture will be on top.
3. Get in touch with your user via Call, Email or Cliq message.
4. Other information such as Address and locale is available in the scroll.


Inactive Users
1. Inactive user can be found in top segment, with number indication.
2. Delete or Reinvite users in one click.
3. Tried few variation with more button and swipe action.
Home Page

Landing Page
1. Tapping lauch will take you to the app permission page.
2. App permission such as Notification, phone permission, Calls and Phone call logs
will be asked at one shot.
3. User must do a mandatory privacy check to edit passcode lock, on/off push notifications.
4. Finally you will be taken to the home page.

Onboarding Page
1. After landing on the home page user can continue the Organisation setup process from the
onboarding card on top.
2. There is a progress bar that shows the completion of the org setup. (Faced Difficulties in showing the percentage.)
3. Onboarding is divided into 3 parts. Basic data, Add data and User setup.
4. All the data that the user wants to add can be done in their own phase.
5. If the user still wishes to continue with the sample data there is a toggle on top of the page.
Coach Mark
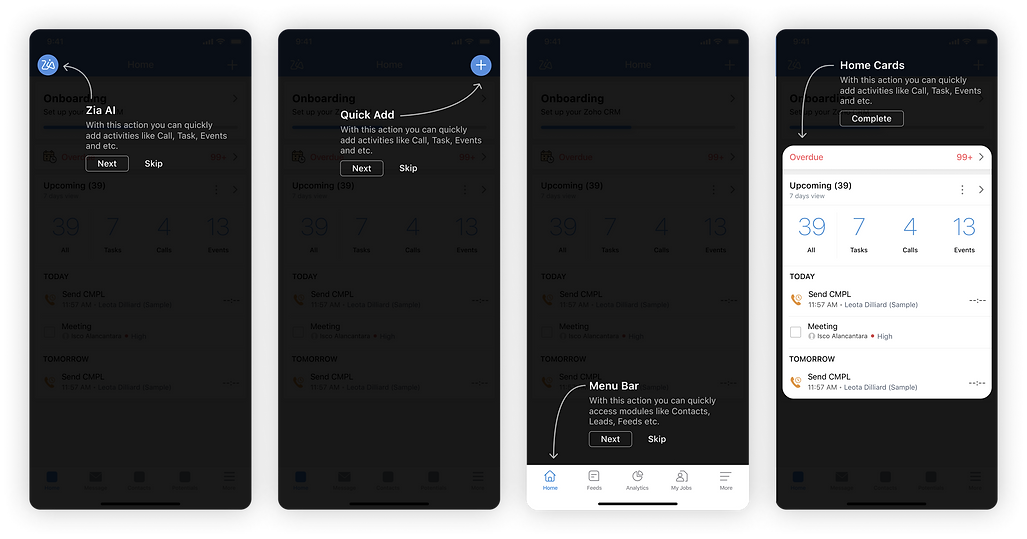
1. Users are given a guided coach mark to explain the feature.
2. Users are given the flexibility to skip the process.
Whole Flow

1. With less than 10 clicks the user will be landing on the home page.
2. We tried reducing the number of clicks but we are dealing with a lot of sensitive personal data which needs to be addressed.
3. We have to respect the user's privacy and give them assurance about how the data is being used to personalise the application.
4. Users are ready to share personal data in the quickest possible way if helps them in personalising the app.